

Importing Microsoft Excel™ to ACL™ for Windows
Contents
In this blog I want to describe possibilities of importing Microsoft® Excel files into ACL™, and offer tips for solving the problems that may occur. This import functionality is needed on an increasing scale in actual practice. An everyday example: We use ACL™ to conduct portfolio analyses in the context of credit financing for clients from the banking sector. Here different places deliver contract, payment and currency data in Microsoft Excel™ file format that have to be imported to ACL™ for reconciliation with other data.
This kind of procedure is often found because many departments operate Microsoft Excel™ to save and process structured data, and the technical aspects for user departments tend to recede into the background.
My example begins once you have started ACL™ for Windows (formerly ACL™ Analytics or ACL™ Desktop) and opened or newly created a project. I will show you step by step how to import an Excel file.
Step 1
Select "Data" in the menu bar and "External data" in the menu that drops down. There are two methods ("Data medium" and "ODBC") for importing data. In our example we use "Data medium…", implying that the file is on the computer itself, a network drive or an external data medium/USB memory. Selecting this menu item starts the "File definition assistant". (Tip: A more detailed explanation would take us too far at this point, but I would like to draw your attention to the following: If you find it difficult to automatically recognize data types or field lengths, try the ODBC (open database connectivity) option. The result might be better depending on the installed ODBC driver.)

Figure 1: Starting the import assistant
Step 2
In the dialog that appears now you select the file to be imported. We use official ACL™ sample data and select the Excel file "Trans_May.xls".

Figure 2: Dialog for file section
Step 3
From the file ending ACL™ makes a preselection of the matching file format for import. But you can alter it at any time if the assumption made by the program is not correct or you do not think it is the best choice. (Note: Here you see how versatile data import in ACL™ is structured – in addition to Excel™ data you can read in data from text files, PDF files, XML files, CSV (delimited) data or Access databases. ACL™ is like the proverbial "Swiss Army knife" when it comes to data import, and so we see it as an advantage compared to many another desktop data analysis tool.)

Figure 3: Selecting the file format
Step 4
Next we select the appropriate worksheet in the Excel file (every sheet has a different structure, i.e. can contain different columns and data, so a separate import operation must be started for each table sheet).
What is more, there are options like whether the first line contains the field names or column designation, and on what basis the types and lengths of the fields or columns are determined. These are important options. If your data have a header per column, this can be adopted automatically. But what is the meaning of determining "type and length"?
It is important to understand that each column (or "field") in ACL™ is awarded a concrete data type. This applies to the whole column. Data types are "text", "number" or "date" for instance, and are a basis for analysis possibilities that you have afterwards. With texts you can conduct no computing operations for example, or analyze text in numeric columns. So ACL™ decides when importing which data type a column is to be given, and how long (or wide) a column must be so that the complete contents fit and are not cut off. The latter is based on the fact that ACL™ produces files with fixed data set lengths and field widths that start at certain positions (offset). This enables the high processing speed – ACL™ need not "read through" the whole file in an extensive analysis but can jump directly to the particular position.
To make the decision on data type and field width, the entire Excel worksheet can be selected with small files and only a few hundred data sets as a basis. Thus the types or lengths are also determined for the complete data and no data are cut off. With very large files this can lead to very long processing times however, where the "First 100 data sets" option is faster as a basis. But it is nevertheless possible that the lengths of the data fields are wrongly determined if the field lengths increase after the first 100 data sets. In other words only use this option if you know exactly that the table is very homogeneous, and the data in the first 100 lines are representative of possibly 500,000 remaining data sets.
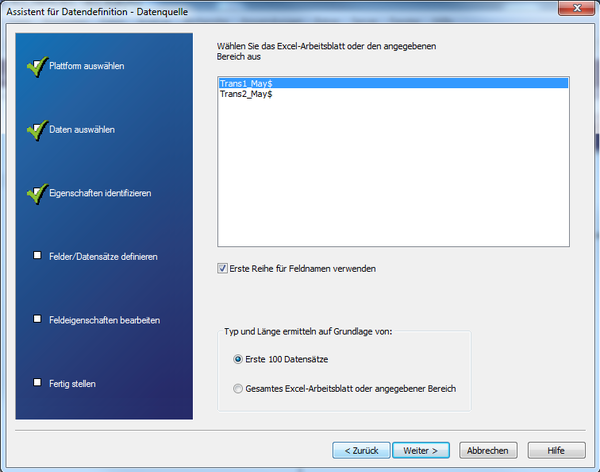
Figure 4: Selecting the Excel worksheet
The next dialog shows the determined types and lengths for each column. If the uppermost line was selected as a field designation, this is taken as the name of the field. Do not worry if something could not be determined exactly – field characteristics specified by ACL™ can subsequently be adapted manually in this dialog in case automatic detection was wrong or inaccurate.
In the "Value" text field you also see a preview of the expected results with the set characteristics. This can be useful in manual adaptation especially for date or amount columns, because you immediately see how the data would be interpreted in the momentary format chosen. If the "Value" text field remains empty although the field contains data, the selected entry format does not match the read data, and so it cannot be adopted correctly – in which case adaptation is recommended.

A point that frequently crops up is the formatting of decimals: How are they presented in the Excel file to be processed? The separators may have to be matched accordingly in ACL™. In this example decimals are defined in English format. In other words "." to mark decimals and "," for thousands.
The left part of Figure 6 shows you what happens if the separators in ACL™ were set in German format: "," for decimals and "." for thousands – the figures are wrongly interpreted.
In the right part of the figure it is correct. Here the separators were set in the ACL™ options before import according to the format in the Excel file. Tip: Remember BEFORE importing to check the formatting of the numbers in your source file (here Microsoft Excel™), and to adapt the settings in the ACL™ options in advance. That often saves time and extra work in the course of import.

Figure 6: Differences in decimals
Another possibility: The "Ignore this field" option enables you to exclude fields entirely from import if the data are not needed or they are blank columns. Tip: Only exclude data when you are sure you do not need them. Data economy is good and important, but if you find after three hours of analyzing data that the column with the invoice number was important after all, you have to repeat the import operation. It is often easier to import more data and afterwards reduce information to what is absolutely necessary when analyzing – that way you can pull something back if necessary.
Automatic recognition of field characteristics is alright for singular imports. Tip: Plan the field characteristics precisely for regular imports, and adapt manually to the possible maximums. That way you can avoid data losses in future. But it is easier if you conduct imports as part of an ACL™ script, as I will explain later.
In Figure 7 you see the "Description" column with a length of 60. Should descriptions with more than 60 characters be read in in future, everything exceeding this will be cut off. You should therefore state an adequate maximum so that no data are lost.

Figure 7: Overview of determined data types and lengths
Step 5
To end the assistant you specify the name of the file in which ACL™ will save the data. So analysis is not performed directly on the Excel table, instead the data are read out and saved in a separate file with the extension ".FIL". That stands for "FIxed Length" and is because, as stated above, data imported into ACL™ have a fixed data set length.
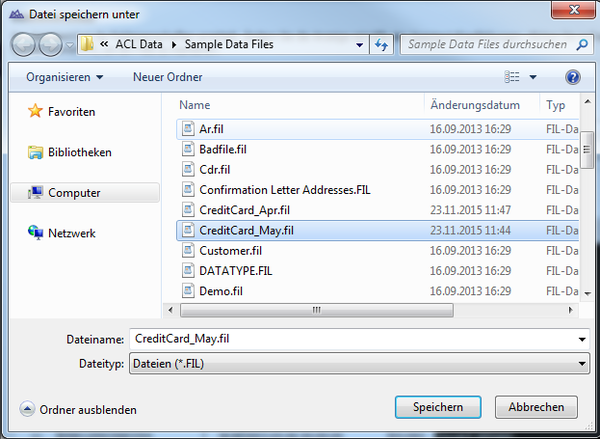
Figure 8: Specifying a designation for ACL™ data file
Step 6
As a check you see an overview of the import settings and the specified field characteristics.
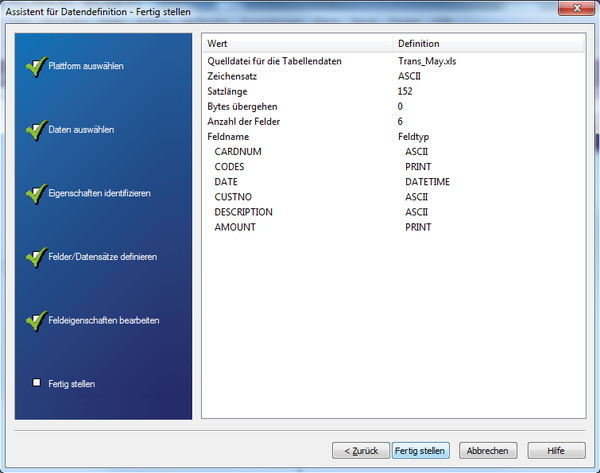
Figure 9: Summary of file import
Step 7
Finally you issue the name of the ACL™ table layout (i.e. the icon in the project navigator). By this name you can call up the table in ACL™ after import. It is possible to name the FIL file (step 5) differently from the table layout (step 7). But in practise this may lead to confusion. Tip: Name the data file and table layout the same, even better like the Excel file – in that way you can recognize the elements that belong together even without technical understanding.

Figure 10: Specifying table layout for use in ACL™
Step 8 Excursion: Generating import scripts
Following import you can see the instruction in the ACL™ log that was executed by the assistant in the course of import. For regular data imports this instruction can now be integrated in a script for automated working of an import. With a little knowledge of its syntax the instruction can easily be adapted if the structure of the Excel file should change or, as described above, to ensure certain field lengths. Then it is no longer necessary to use the assistant. What is more, the instruction could be adapted for similar files. Tip: If your Excel files are identically structured and you are an advanced ACL™ user, you can ease your "life" in data analytics very much by an import script.
Here is our sample in the form of ACL™ script code.
IMPORT EXCEL
TO CreditCard_May "C:\ACL Data\Sample Data Files\CreditCard_May.fil"
FROM "Trans_May.xls" TABLE "Trans1_May$"
KEEPTITLE
FIELD "CARDNUM" C WID 19 AS ""
FIELD "CODES" N WID 4 DEC 0 AS ""
FIELD "DATE" D WID 19 PIC "YYYY-MM-DD" AS ""
FIELD "CUSTNO" C WID 6 AS ""
FIELD "DESCRIPTION" C WID 60 AS ""
FIELD "AMOUNT" N WID 9 DEC 2 AS ""
Advantage of an import script
- You have detailed possibilities for column definition.
- It enables explicit type definition in script that is easily adaptable if you are familiar with instruction syntax.
Disadvantage
- All columns of the Excel worksheet have to be worked or their processing defined, blank columns too. This can create difficulties in regular data imports in particular if the format of the Excel worksheet does not remain stable. Only one column needs to contain a space and a definition is awaited.
Conclusion
ACL™ offers a number of ways to import Excel files. This way, using the assistant, is one of the most flexible. It offers convenient support for beginners on the one hand, and many manual setting possibilities for professionals on the other.
Tip: Try to make the Excel file (in as much as you are able to) as simple and straightforward as possible. Do away with formatting or multiple-line headers or category titles, because this can make column recognition more difficult. If this is the case, it can make sense to restructure the Excel file manually before import. Quite basically: The clearer the structure of the Excel file, and the more "robust" it is (number and sequence of columns, content), as a rule the more easily the file can be imported or data import created through a script.
Link „ACL Richtlinien Excel-Import“
For any comments on this article, feel free to write us at info@dab-gmbh.de